Hyundai H-CMMD4042 User Manual
Browse online or download User Manual for Car radio Hyundai H-CMMD4042. Hyundai H-CMMD4042 User Manual
- Page / 123
- Table of contents
- TROUBLESHOOTING
- BOOKMARKS
- EXCELLENCE 1
- Table of contents 2
- Important safeguards 6
- Installation/ connection 7
- Din rear-mount (method 2) 8
- Electrical connection 9
- Unit controls 12
- Front panel 13
- Remote control 16
- LCD display 19
- Monitor operations 20
- Image setting 21
- Parking cable function 21
- Monitor movement mechanism 21
- Touch screen operations 23
- General operations 25
- Mode selecting 26
- Display operations 26
- Digital tuner operations 27
- Band selection 28
- Manual/ automatic tuning 28
- Programming tuner stations 28
- Preset scan 29
- TA (Traffic Alarm) function 30
- PTY (Program Type) function 30
- Region function 31
- RDS clock 31
- Disc operations 32
- Discs for playback 33
- Loading a disc 34
- Playing/ pausing 34
- Direct entering the number 35
- Scanning forward and backward 35
- Slow playback 35
- Repeat playback 36
- Disc menu (for DVD only) 38
- On-screen display (OSD) 39
- Changing angle (for DVD only) 40
- MP3/WMA files playback 40
- Alter between 2 Ch and 6 Ch 41
- MP3 overview 41
- TV tuner operations 43
- AUX IN mode 44
- System setup menu 46
- General setup 47
- RDS setup 49
- Screen CAL 49
- DVD setup menu 50
- Language 51
- SPK configuration 55
- Handling and cleaning discs 57
- Troubleshooting guide 58
- Specification 59
- AM section 60
- Audio specification 60
- Line out 60
- 61
- 65
- / 66
- 67
- 70
- 70
- 70
- 71
- 72
- 76
- LCD 79
- 81
- 82
- 82
- 82
- 83
- 84
- 86
- 87
- 87
- 87
- 87
- 88
- 89
- PTY () 91
- REGION 92
- RDS 92
- 93
- 94
- 95
- / 95
- 95
- 95
- 96
- 96
- 96
- 97
- DVD 99
- 3 103
- 105
- AUX 106
- 107
- 108
- ASP 109
- RDS 110
- DVD 111
- ProLogic II 115
- 117
- 118
- 120
- 122
- AM 123
- 123
Summary of Contents
EXCELLENCEbyH-CMMD4042MULTIMEDIA DVD-RECEIVER WITH MOTORIZED 7” TFT DISPLAY ANDTV-TUNERInstruction manual DVD- 7”
10Note: For your driving safety, please link your parking wire with low power level, and keep it controlled bymanual brake switch. Wire should be high
1001. DISP ,
101:Source: - ()EQ: user – Loud: - Loud
102/ / (, , ),
103:. MP3 CD 2-
104 CD-R CD-RW, MP3:
105. SRC, TUNER ().
1061. 10 . ENTER .2.
107, .
1081. . .2. /
109 2: / , . /
11Parking brake cable connectionsNote: for safety purpose professional installation for the following connections is recommended.For cars with hand br
110: : 60 , 80 , 100 , 130, 150 , 200 .Treble :
111CT:/ RDS.:/ : . (
112 DVD SETUP , DVD . DVD
113:. AUDIO , .DVD :
114), (), , . (Pan & Scan).1. .2.
115: .
1163. /,.4. /
117: 1, 2, 3, 4, 5, 6.
118:: ( 16), ( 13 ), (
119: , .
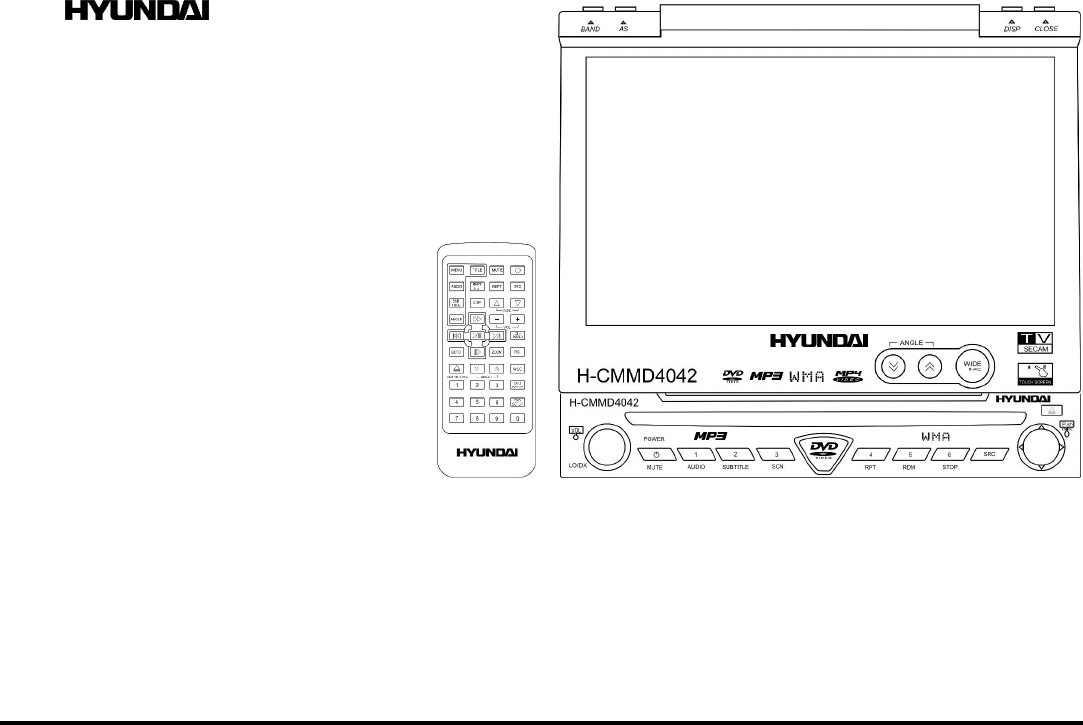
12Unit controlsMonitor1. BAND buttonPress it repeatedly to select your desired radioband during TUNER (RADIO) mode.2. AS buttonIn TUNER (RADIO) mode
120 , (
121 ..
122: 12 : 10 : 50 4
123 24 AM : 522-1620 12
13repeatedly. To adjust the setting press the buttons. Press it and hold for 2 seconds to exit the mode.Front panel9. Disc slot10. VOL knob/ AUD
1413. AUDIO buttonIn DVD mode press it to select the channel. In VCD mode press it to change the channel.14. SUBTITLE buttonIn DVD mode press it to se
1522. RESET buttonPress the RESET button to restore the unit to the original factory settings.23. Monitor24. EJECT buttonPress this button to eject th
16Remote control1. TITLE button – press it to open the disc title list.2. MENU button – press it to open the disc menu.3. REPT A-B button – use it
17In DVD mode press this button to slow the playback. Press again to slow rewind playback.11. GOTO button - press this button to set the player play
18Changing the battery1. Press the catch and at the same time pull out the battery tray (pic. 1).2. Insert the 1 x lithium battery, type CR2025 (3V)
19LCD display1. Disc indicator.2. Disc playback indicators: SCN (scan), RPT(repeat), RDM (random), ALL (all chaptersplayback).3. LOUD indicator.4.
2Dear customer!Thank you for purchasing our product. For safety, it is strongly recommended to read this manual carefullybefore connecting, operating
20Monitor operationsOpen/close TFT monitor1. Press the OPEN/CLOSE button to open the monitor to the last viewing position.2. Press the OPEN/CLOSE bu
21 OR press the WIDE/PIC button on the monitor or the WIDE button on the RC repeatedly to select theaspect ratio: CINEMA => NORMAL => STANDBY.
22unit. If it doesn’t help please reset the unit.
23Touch screen operationsIn any mode touch the left corner of the top area of the TFT display toopen the main menu.Now you can select the playing sour
24Touch operations under DVD mode during playing the PM3/WMA filesTouch operations under Tuner (Radio) mode
25General operationsReset the unitOperating the unit for the first time or after replacing the car battery, you must reset the unit.Press the RESET bu
262. Press the buttons on the front panel or press the / buttons on the RC to select the desired audiosetting: EQ => BASS => TREBLE =>
27Digital tuner operationsNote: RDS service availability varies with areas. Please understand if RDS service is not available in you area,the followin
28Band selectionPress BAND button on the front panel or the STOP/BAND on the RC once or more to select: FM1, FM2, FM3,FM (OIRT), AM1, AM2, AM3.Manual/
29AMS (Auto Memory Store) functionSelect the band. Press AS button on the panel or the PLAY/PAUSE / ENTER / SCAN button on the RC to enterauto search
3General operations...
30TA (Traffic Alarm) functionIn TUNER (RADIO) mode press the button on the panel and hold for 2 seconds to turn ON or turn OFF the TAfunction.In TA
31Saving the PTYWhen the PTY function is on and the unit receives the current program type press the 1~6 button to store it intothe channel selected.
32Disc operationsGlossaryPBC (PlayBack Control)PlayBack Control is a menu recorded on the disc with SVCD or VCD2.0 format. For the discs contained PBC
33Discs for playback This unit can play disc types: CD/DVD/CDDA/CD-R/-RW/DVD±R/±RW. Compatible with formats: DVD-video/SVCD/VCD/HDCD/MP3/MP4/WMA/P
34Loading a disc1. Turn the power on.2. Insert the disc with the printed side facing upward into the slot. The unit will switch to DVD modeautomatic
35Direct entering the numberTo enter the 2- or 3-digit number of the track or chapter press the desired buttons with digits on the RC. Forexample, to
36Repeat playbackPress the RPT button on the panel or REPT button on the RC once or more to repeat the playback:For VCD/CD: REPEAT SINGLE => REPEAT
371. During the disc playback press the GOTO button on the RC to enter the Search menu. For VCD discs pressthe GOTO button repeatedly to select the T
38Audio track and channel selection (for CD/VCD/DVD discs)For DVD playback: press the AUDIO button to change the audio language. OR enter the AUDIO me
394. Press STOP button to return to menu.5. Press MENU again to exit menu.On-screen display (OSD)1. During playback press the DISP button on the RC
4Playing/ pausing ...
40The playback status will be shown as following:Source: - the current sourceEQ: user - current equalizer settingLoud: - the loudness status.2. Press
41Press the AUDIO button on the panel or the RC to select the audio language or the channel. Press the REPEATor RANDOM buttons to select the mode of t
42 If you play a non- MP3 file that has the “.mp3” extension, you may hear some noise. In this manual, we refer to what are called “MP3 file” and
43TV tuner operationsSwitch to TV tuner mode1. Connect the TV set to the unit.2. Press the SRC button repeatedly to select the TUNER (TV) mode.OR in
44Scan tuning1. You can scan each stored channel for 10 seconds in sequence. Press the ENTER button on the panel to startscanning.2. Press the PLAY/
45OR in the main menu select the AUX IN item.
46System setup menuIn any mode touch the left top corner of the screen to open the main MENU.Use the cursor buttons or press the SETUP button on the s
47General setup1. Enter the GENERAL SETUP menu.2. Use the buttons on the panel or / buttons on the RC or touchthe desired item on the screen
48TFT auto open: set the monitor working mode when the unit is on and off: On (when the unit is off themonitor draws down into the unit automatically,
49Sub phase: if trying to boost the bass output of subwoofer the bass gets more murky. This may indicate that thesubwoofer’s output and bass content y
5Manual tuning...
50DVD setup menuIn any mode touch the left top corner of the screen to display the mainMENU. Use the cursor buttons or touch the SETUP button on the s
51Language1. Enter the LANG menu.2. Use the buttons on the panel or / buttons on the RC or touchthe desired item on the screen to select the
524. Press the buttons on the panel or / buttons on the RC or touch the desired button on the screento select the desired value.5. Press PLAY/
53DRC: set the DRC (dynamic range control) for better playback for low volume playback: On (use bass to playthe more dynamical audio), Off (normal pla
543. Press the buttons on the panel or / buttons on the RC ortouch the desired button on the screen to enter the list of values.4. Press the
55SPK configuration1. Enter the SPK CONFIG menu.2. Use the buttons on the panel or / buttons on the RC or touchthe desired item on the screen
56RatingThis unit has the built in parental lock feature to prevent authorized person to view restricted disc content.1. Enter the RATING menu2. Use
57Handling and cleaning discs Dirty, scratched or warped discs may cause skip ping or noise. Handle the disc only by the edges. To keep clean do n
58Troubleshooting guideSymptomCause SolutionNo power.The car ignition is not on.The fuse is blown.If the power supply is properly connected to the car
59SpecificationGeneralPower supply: 12 V DCCurrent consumption: max. 10 AMaximum power output: 50 W x 4 channelsCompatible formats: DVD/SVCD/VCD/HDCD/
6Important safeguards Using the device at temperature below -10º may cause the breakage of the device. BEFORE USING PLEASEHEAT UP THE PASSENGER COM
60Specifications are subject to change without notice. Mass and dimension are approximate.AM sectionFrequency range: 522 kHz - 1620 kHzPreset memory s
61! .
62 ...84
63...
64 ...105
65 -10º .
66, ./
67:. ,
68
69: ,
7Installation/ connectionThis unit can be installed in any dashboard having an opening as shown on thepicture. The dashboard should be ~ 4.5 – 5.5 mm
70: : DVD ,
711. BAND TUNER () , .2. AS TUNER ()
72 2 , .8. WIDE/PIC
73 ( AUDIO), . , .
7419. 20. SRC, : TUNER ( – ), DVD, DVDC, AUX IN, C
75 TUNER () , . TUNER ()
761. TITLE – , .2. MENU – ,
77/.9. PLAY/PAUSE / ENTER / SCAN -
7820. VOL +/- - , .21. STOP/ BAND – DVD ,
79 LCD 1. .2. : SCN), RPT (), RDM), ALL
8Removing the unit1. Push trim ring upward and pull out the upper part. Push it downward and pull out the lower part.2. Unscrew 4 pieces M2 screws.3
8013. : SCN), RPT (), RDM), ALL
81/ 1. OPEN/CLOSE, . ,
82 , NGLE . ( DVD
83 «», ,
84 , (MENU), TFT-.
85 DVD MP3/WMA Tuner (),
86 RESET. :
87 , POWER/MU MUTE , .
88: RDS () . , RDS
89 BND STOP/BAND , : FM1,FM2, FM3, FM (OIRT), AM1, AM2, AM3.
9Electrical connection
90. AS 2 PLAY/PAUSE / ENT
91 RDS , AF.. TA () T
92, PTY, , 1~6,
93PBC () – ,
94 :CD/DVD/CDDA/CD-R/-RW/DVD±R/±RW.
951. .2. . DVD.3.
961. , :
97REPEAT OFF (). RPT.1. ,
98 DVD MPEG4/VCDSearch Track search Disc searc
99channel () => Stereo (). DVD 1. MENU ,
More documents for Car radio Hyundai H-CMMD4042


Related products and manuals for Car radio Hyundai H-CMMD4042
 (55 pages)
(37 pages)
(39 pages)
(45 pages)
(22 pages)
(55 pages)
(37 pages)
(39 pages)
(45 pages)
(22 pages)
 (73 pages)
(66 pages)
(54 pages)
(83 pages)
(64 pages)
(59 pages)
(39 pages)
(85 pages)
(45 pages)
(102 pages)
(109 pages)
(64 pages)
(75 pages)
(56 pages)
(44 pages)
(73 pages)
(66 pages)
(54 pages)
(83 pages)
(64 pages)
(59 pages)
(39 pages)
(85 pages)
(45 pages)
(102 pages)
(109 pages)
(64 pages)
(75 pages)
(56 pages)
(44 pages)
© 2020, manymanuals.com. All rights reserved. | 0.623 s |
 Manymanuals.com
 Manymanuals.de
 Manymanuals.fr
 Manymanuals.it
 Manymanuals.pl
 Manymanuals.cz
 Manymanuals.es
 Manymanuals-pt.com
Comments to this Manuals